Robotic-Assisted Laparoscopic (rTAPP) Umbilical Hernia Repair with Intra-abdominal Preperitoneal Underlay Mesh (IPUM)
Transcription
CHAPTER 1
Hi, I'm Charu Paranjape, I'm the chief of general surgery and acute care surgery here at Newton-Wellesley Hospital and also a staff surgeon at Massachusetts General Hospital. Today we're about to see a robotic laparoscopic ventral hernia with the technique called IPUM, which is called intra-abdominal preperitoneal underlay mesh placement. This is a technique where we dissect the hernia, close the hernia, then place a mesh under the peritoneum and then cover the mesh with the peritoneum. In this technique there are two advantages. One is actually primary closure of the hernia itself and secondly, even though we have a coated mesh, it's always, always better to have a covering of the peritoneum on the mesh so as to prevent adhesions and other complications associated with an exposed mesh. Robotically, this is way more easier compared to other minimal invasive techniques such as laparoscopic techniques for the reason that we have a full wristed motion and instruments because of the robotic platform, and it's easier to suture the abdominal wall with the robotic suturing. And secondly, in certain patients with higher BMI, the angles at which we approach the abdominal wall are significantly better, robotically.
CHAPTER 2
So we're gonna be doing an open Hasson technique, abdominal wall entry. We triangulated the incisions here already. So we're gonna just go through the skin subcutaneous tissue to identify the fascia. Like that. I got this. Here's the fascia right there. I'm gonna incise the fascia. Knife, please, thank you. That's good, we're gonna introduce that S-retractor and then tilt towards you, a little bit like that. So it should be in. Sometimes it requires a little bit of, yep. Take the, this 12, correct? Yep. Okay, and take that off. We can have gas on, please. It's really stuck, there you go. Okay, yep. Okay. Do you need the reducer? Okay, so we are inside the abdomen. As you can see, there is the previous sort of site of the hernia where the bowel was incarcerated. So the patient presented to the ER with an obstruction, and it was relieved by reducing the hernia in the ER, so we are here to sort of fix it so this doesn't happen again. So, this actually fits the pattern that when we say the umbilical hernias are smaller, they're actually more dangerous than when they have a very wide defect. So in this case, if you see, and we're gonna look at it again. It's relatively a smaller neck of the hernia, and this is a previous hernia that has been repaired previously by a mesh. But you can see that there is a relatively smaller defect, which are actually more dangerous than the wide neck hernia. So we're gonna introduce the second 8 mm, we'll also introduce the Echo Mesh soon. So look here, and we're gonna triangulate this so that we are targeting towards our target. What size mesh do we have? Okay, so just by measurement I'm just gonna measure. We typically also measure it on the CT scan, which we have, but just to give a perspective, we typically need at least 4 cm beyond the defect. And so the 11 should be, should be good, 11 or 15 actually, can I have the 15? So what we're gonna do today, well, or at least try to do, is there are two ways you can do repairs in this space. One is called IPUM, which is an underlay mesh, that's the UM, last two letters of the word, where the mesh is in the preperitoneal plane. This is a covered mesh, but any mesh, ideally, should not be exposed to the bowel. And so, ideally, if there is a good peritoneum that you can cover, we always like to do that even when they are covered meshes. The other technique is called IPOM, where you just put them intraperitoneally onlay mesh, so it's basically on top of the peritoneum. That is good when, either, in recurrent hernias like this, the peritoneum can be thin and you may not have a good coverage of the peritoneum. And so you know, these are covered meshes and so they prevent any kind of erosion or adhesion with the bowel. And so in this case, Kathleen has very nicely sort of rotated this mesh, as you can see here, I don't know if they can see on your camera. So she has very nicely rotated this. This is a special mechanism by which you can actually introduce the mesh. I'll take a grasper. If you want to come on top. So she's gonna introduce it into the abdomen and we're gonna, the camera camera's seeing it. And so here is a way. There is a method to the madness here, how you introduce these meshes in the abdomen. Yeah. Okay, and there we go. So we're gonna just keep it here for the future use. And as you can see, the mesh has a rim around it. So it has a holding mechanism by which the mesh can be sort of held against the abdominal wall. So now we're gonna dock the robot so that we can take some adhesions down that we just saw and then create the flap.
CHAPTER 3
Drive the laser line to the end of the goport. Install the endoscope for targeting. Point the scope at the target anatomy, then press and hold the targeting button. Targeting complete. Dock the remaining arm. You can advance it to the black dot. Yeah, perfect. Denny, if you want to come over.
CHAPTER 4
So here on inspection we see a couple of things. Number one, we see a defect. We also see these old sutures as you can see. So these are the sort of the telltale signs of the old repair. We also see this submentum sort of going in there and was blocking in as well as a small bowel that was there before. So what we're gonna do, step one, is we gonna sort of go in this plane right here and take this submentum off completely, then we're gonna work starting like over here, several centimeters. So typically you will say, so since it's a 15-cm mesh, so it will be one, two, three, somewhere here, we're gonna sort of raise a flap and go in there, reduce the sack completely, and go all the way over there, then place the mesh, then put the flap back up. So, Denny, are you ready? Yep. Okay. So, I'm gonna give you the control. So, just gentle tension with this down. This gonna be pointing downwards and then buzz, and just buzz and cut right at this plane. Correct. This robotic gives you a great vision on these planes as well as as the energy source here. So right here I would buzz that, yep. Little bit more. Just a little bit there. Yep, you can cook it if you want. Yeah, and then yeah, right at the white, I would buzz, yeah. Bring that monitor in and down. Buzz. And then look at this one more time before you let it down. Yeah, I would buzz that. And... Perfect, all right, so I'm just gonna take two minutes to just take over and give you the flap.
CHAPTER 5
So I'm gonna mark the area where we're gonna start. So like I said, you're gonna say one, two, and three, so somewhere here. The key part here is not cutting the abdominal muscles, right? So sometimes, like I was saying, these peritoneal flaps can be very, very thin, especially with previous surgery. And so you end up having a very thin flap, which may not be ideal. In this case, I think we have a decent flap. Extending this to the lateral part. And the plane, obviously, is here. Again, we have to make sure that we're not cutting the abdominal muscles and like you can see how thin it gets here. There's a little defect there. So Denny, try your best not to. I mean, it's hard sometimes, but try your best to not have... So why don't you go start here, go all the way until here and and raise this down, and hopefully we won't cause more holes here, so, okay. This appears to be the stronger side, so you can start there probably. Yeah. Feel free to zoom in as necessary. Yeah, and then I would buzz, make sure, yeah. Good morning. Hey, how are ya? Good, how are you? Good, good. Doing a recurrent umbilical hernia, had a bowel obstruction in the ER so it was reduced, and then we're just doing elective IPUM, so try to, I'm trying to raise the peritoneal flaps so it's not, mesh is not exposed, yeah. Great, good to see you. Yeah, same here. Very nice, keep that in the center of your field, right now you're working sort of in the corner, yep. Beautiful. So that is your plane right there, I would just go ahead and just open that up right there. Again, try to keep it in the center, yes. Yep. And feel free to release it more if you feel like you need to. So zoom out just a tiny bit. Zoom out more, and then maybe go from here all the way till there or something like that, just under that so that it's not under a lot of tension when you... Yeah, you can open, yeah, exactly, yep. Yeah, so just be careful, see how it went into the fascia there. Yeah, exactly, yeah. Same thing. I think there's - go in there. Yeah, right there. Yep, there you go, peel it this way, correct, yep. I like your technique, pushing it down. I would just also just buzz this part, just be careful with that. Yep, let's go right here, like this, right here. This hole, yep. Keep it in the center, adjust your camera, yeah, so you have a perspect, and keep peeling with this guy. So just, yeah. Nice. All right, I think that's nice enough there. All right, and you can concentrate here now, yeah, so, yeah. Perfect, yep. Yes, very nice. So zoom in and then adjust, yeah, there you go, perfect. Nice. Perfect. This flap is slightly a little bit more treacherous, but let's see. Yeah, there you have to be careful. So one of the advantages of a robotic approach is it lets you do this very meticulous, tidy dissection at ease with good view and full reticulation or rotation of your wrist with a wristed instrument, it makes a big difference. There's a stitch, so I would leave that for a second. I would just raise the flaps first, you know, so - yeah. Right here? So... You can start where it's normal sort of, which is here, correct, yep, correct, yep. So adjust your camera a little bit. And rotate your, yes, correct, yes. And then adjust your camera so you're directly looking into that. You may have to adjust your wrist, left wrist just a little bit so you can see a little bit better. Can I suggest something? Yeah, I'm just gonna take over one sec. So instead of this, so now, see, now you have a bigger picture and this, see this? So now suddenly instead of this view, you have this view, and then you can sort of look here in the bigger picture. Like that. Same here, I would go there all the way and then keep raising this. This is a little - this is a hole I guess, so this peritoneum has, you have a rent here already. I think it's here. So you could develop, let me start there. It's very thin. Yeah, so as we can see there's a slight rent here, and that's very common in these flaps because of how thin they are, as you can see, but we should be able to raise continuing this down. And even if it's, you know, slightly - there is a rent, it's totally fine because it's just a covered mesh. Just trying to raise this flap laterally, just a tiny bit. I'm just gonna try to give you a little edge so you can continue. All right, so we're almost halfway. So you can bring this down and get this sack down, that will be the next step, and then try to sort of, we have to go almost till this point, right? So we have to sort of raise that flap this way. So it's a nice and wide flap, so take your time to, especially at this midline, to make sure you're on the other side. So basically just hug this. This is a stitch from before. Okay, ready? Yep. Beautiful. Right there, yeah. So here we can see that the sack is very stuck, yep. Right there, yeah, yep. Okay, right there. I might have to go through the fascia. Yeah, you just cut this, go under that stitch. Cut it, good, yep. Yep, that's the plane right there, yep. A little more tension with your left hand, yes. See, you made a big difference, yep. All you have to do is, yeah, correct, yeah, that's another stitch, yep, keep going. Yep. This is the sac. It is the sac, correct, yep. So you want to be here, just touch this, and we had to reduce the sac completely. So just touch from here to here. Just keep buzzing, yep. Yep. There you go. You can grab the sack directly. Perfect, and just, yeah, keep peeling that away, yeah. And then keep touching, yeah, correct. There you go, so open, there's a plane in between here. So open your jaws, one goes inside, correct. Correct, yep. And avoid heat here, right? You can, it should be fine. Buzz, yep, perfect, yep. Perfect, there you go, yep. Yeah, complete that completely here, yeah. And there, right there is the plane, yep. Correct. Same plane, you had to do it here as well. Yeah, I think I have to do it on this side. Correct. So it will start like somewhere there to here, yeah. Yes. There you go, and then complete this. Go under this right here till here. There's a little there. Right there, yeah, correct. Perfect. It's just tiny. It's like, a little bit there too. There, yep. There, yep, perfect. So I was just gonna say that was a thin sac there. So you went through that, yep, it's okay. Because the energy travels, yeah. Yep. So release this first, this is the easy part. We don't use energy now, yep. There you go. Go under this, complete this, it will be easier, so... Right there, correct. This you can use the energy, yep. Another stitch, yeah, we're good. Would continue this, complete this, and then come back here, yeah. Nice. Yep, keep it in the center of your field, there you go. Whenever you feel a little more tension, you come back to the center. So keep coming back to the center, yeah. Yep, right here, all the way till there, and then we'll see if we can get that thin sac. Nice. Nice, yeah, so I would go from here to there. Yeah, no problem. All the way, yeah, all this can be energized, correct. Yep. Energy, yep. Nice, yep, and then come to here up again, yep, after you do that, yep. Right there now, yep. Correct, so this is the easy part. I would do this part here, from here to there. This part, yeah, just buzz all that, yep. Hold the sac closer probably. Yeah, hold the sac closer with your left hand. Correct. Yep, this you can use without the energy, yeah. Yep. Yep. Thin sac, very thin sac. Yep. So again, you can wait. Let's do this part from here to there, right. So you can do this flap a little bit, this guy, yep. There you go. I would do this flap first, yep. Yes. So right here, yeah. Right here? I would do this flap first, it's easier, yeah. So you can see. Easy, yep. Yep. Yep. Nice. Right here. Yep, nice, yep. Now, yep, and release this fat. So I would go, hold that yellow fat, like this guy. And that way. Correct, more tension that way. Yes, so see how you see that? Yes, right here, right here is the, yeah. So you can go under this white layer. Correct, and just release it. So don't use the energy here, yeah. Correct. Correct, and then push. Correct, and push this away. There you go, there you go, yep. You see that right there? Yeah, yes. So... Should be, yeah, all that, yeah, there you go. That's your plane. Yeah. And this is all sac. This white thing is sac, so you may wanna regrab that if you want to. There you go, so push this down, push all this down. This, yep. Correct, there you go, yes. I would release this guy, correct. Yep. And, correct, so yeah, there is up. That's skin, that white thing is skin, so correct. So you want to be in between. So cut all this nice plane that's in there, we can cut all that stuff though. We don't want to be in the skin. Yeah. Yeah, so right there is the plane, regrab the sac again. Correct, yes, beautiful, there you go. Perfect, you can just cut it with your, the sharp dissection, yeah. No energy here, yeah. That's sac, that's sac. So this is sac, this is the plane right there. Correct, so cut it. Yep. That's sac again, this all is sac. The plane is like right there. Yes, correct. See if you can see the plane here better. See right there. Yeah. Correct, so start there. Start cutting like right here next to your scissor. Yes, correct, and this, double up that, yep. Perfect, yeah, cut that. Yep. Cut all this stuff, yep. Yeah, you can sharp cut this, yeah. Right here, right here. Get more tension. Right here? There, yep, perfect. Yep, perfect. Yep, yep. Yeah, this. Yeah, clean stuff you can, yeah, there you go. Yep, okay, very good, release it here, yep. Yep. Right here. Use your wrist to change the angle a little bit. There you go, cut that, yeah. So use the sharp, yep. Correct, yep. Sharp, yeah. Yeah. Very good, push it away, yep. Perfect, regrab, correct. Yep, right there, correct. Push the skin away, yep. And here the thing is if you want to er, you want to er on the sac side to cut if you want to cut because you don't want to cut the skin. Right. So even if you cut the sac it's fine, but you're doing fine, I'm just saying. You're doing very well. Sharp. Yep. Perfect, yep. Yep. Just hug the fascia so you'll be fine, correct, yep. There you go. Regrab, yep. I would pull it down rather than up. Pull it this way, correct, and then readjust your camera so it's in the center, yeah, correct. Yep, nice, beautiful. That's a very good release there. Just hug the stitches, yep. You can use energy here, yeah, because there will be typically vascular. Yes, perfect. Yeah, I would do this right there, yeah. Yep. Yep. Energy and cut, perfect. Yep, yep, same there, yeah. Nice, yeah. Zoom out and then readjust your, so it's not sort of. Yeah, so what you want to do now is, you're doing very well, the sac is completely reduced. So you just want the, yep, you just want now the flap adequately several centimeters beyond this. We will need a - and Kathleen probably already has it, but we'll need a Endo Close to, or some sharp thing to go in the center of the defect to hold the mesh up. Yeah, I have it. Thanks. Nice, I think this side is very good in terms of the flap. This, and then you'll have to do some more work on the right side of the skin screen. Let's do more work here on this side, yeah. So start there and keep coming on this side because this needs more work. Start here in the middle, yeah. We'll need the 9-inch V-lock. Do you have a six inch V-Loc or no? Absorbable or non-absorbable? Non-absorbable, 0. Nothing in in 6 inches so probably. Okay. Hug the fascia more, yeah. Beautiful. Buzz that, yeah. Buzz, yeah, this, yeah, exactly. Plane right there, hug the fascia more, yeah, buzz, keep buzzing. Keep it in the center of your field, yeah. Do this if you want, it's easier here, yeah. Can you change the eye of the camera? No, I'm asking Kathleen if she can switch the eye, there's like a right in the center, there's a little... Can we change the eye of the camera? Yeah, I already did. Oh, you did, okay. Change again? Depends how much it's bothering him and it's, let's clean the camera. Yeah, you may want to start up, higher up too, so that it's in a good flap. Yeah, so like here, you know, just, yeah. So maybe even release, yeah. Just a little bit? Yeah. Maybe till here. Yep. Yep. It's a hole. So yeah, when you think it's very thin, just don't use the energy, it's not your scissors, it's the energy that causes the hole. Yeah. Just use scissors, yep. Yep, keep going. Typically here it will get better in terms of the strength of the peritenoneum. Yep. Buzz this, yeah. Yep. We have a few more centimeters to go, yep, there. Beautiful. So just continue, I think you're good there. I think this plane you need to, yeah, exactly. So up till here and this, and then on the other side, and then we'll measure and see after that. So yeah, there you go. Yeah, I would do this first, yeah, just do from here all the way there. Yeah. Yeah, this guy, yep. Grab it from inside, it will be give you more tension. Stay close to the fascia. Push it, yeah. Yep. It needs tension, has no tension. So left hand has to give you more tension. Nice. I think that's good, I would just do here and then we'll measure and see after that point. Let's do this part. Yep. This right there. All right, after you do this part, I'm gonna measure. I think we're good. Buzz that, yeah. I know it's tempting, let's measure. Yeah, finish this if you want, but I think it's pretty good. Where is our top, here, right, that's good. Maybe here a little bit. Yeah. All right, I think we're decent, let's see.
CHAPTER 6
All right, so what I'm gonna do now is it's going to change to 30 down. I think we're pretty good. Just trying to measure it up. It should be good, huh? Yeah. So the cool thing about this mesh - I'm gonna flip it up again. All right, so Kathleen is gonna make a little stab incision right at the center of that defect. And then she's gonna introduce an Endo Close later, but before that, we're gonna close this. So I need the 0 V-Loc and a needle holder. We have to incorporate the skin. Same thing as we discussed yesterday, rather than pulling, you want this to be pushed. As you can see, there is some resistance. It gets better as you suture. You have to do this a few times. So we're on this side, right? All right, I am gonna ask Kathleen to push the skin so that we can incorporate that. It's not your finger, correct? Yeah. And one other thing here is you want to pull it, you know, not this way, but this way. So, perfect. I'll let you just take, just go under this whole thing, and you could even come back and go here and then lock it. All yours, so hold the tail. Yep, forehand, perfect. Yep, go under. Yeah, the whole thing, go under the whole thing. Yep. Lot of rotation, again, your tendency is to push. There you go. Perfect, yep, so get that other thread out of your way. The mesh one, yeah, okay. And then pull, pull, pull towards this way. Do we need to lock it here? Maybe lock after the next one. And push the muscle away and keep pulling. It will come together. Take this whole thing, maybe a little bit of the skin. How's the skin looking? Is it indented? A little bit. Okay, push that again, like here. Just do a forehand if you want, this doesn't matter. Yeah, okay. Do you want me to get the skin in place? Yeah, so take this first. Yep. Keep the needle in there, let her push the skin, and take the skin and come off from the other side. Use the wrist. Yes, there you go, okay. Push the skin, please. Okay. There you go, take that. Watch out, taking skin. Yeah. I'm gonna take it in one. Yep. Perfect. Yep, keep rotating rather than pushing. Hold it at the back. Keep rotating, push the abdominal wall away. There it comes, keep pushing, yep. There, yep, just take it here, correct. And then lock it. We'll need scissors and then push it more, let me rotate it more, sorry. There you go, perfect. The needle holder will do a better job, yeah. And rotate, there you go, lock it and then pull. You can drop the needle, so you can use both hands to do hand over hand. Drop the needle, and, correct. Pull either that or this direction rather than towards you. Yeah, I don't think it did. Well, I was gonna run it all the way back. Oh no, you just need one more, maybe. You just need that thing to sort of semi close. You don't have to run all the way back. Just do it in one, yep. You find this easier than forehand? Here, yeah. Okay. It just seems like you struggle a little bit, whatever is easier for you. Yeah, look at that, there, just go under the whole thing. Yep, the whole thing, yep. Perfect, yep. Nice, lock it, yep. Again, your pull has to be at the, you know, so that it, here let me show you, one sec. All right, so now that it's on this side, I'm just gonna do this. If you want, you can take one more. That should be okay, I think. We can cut it, it doesn't have to be perfect. Okay.
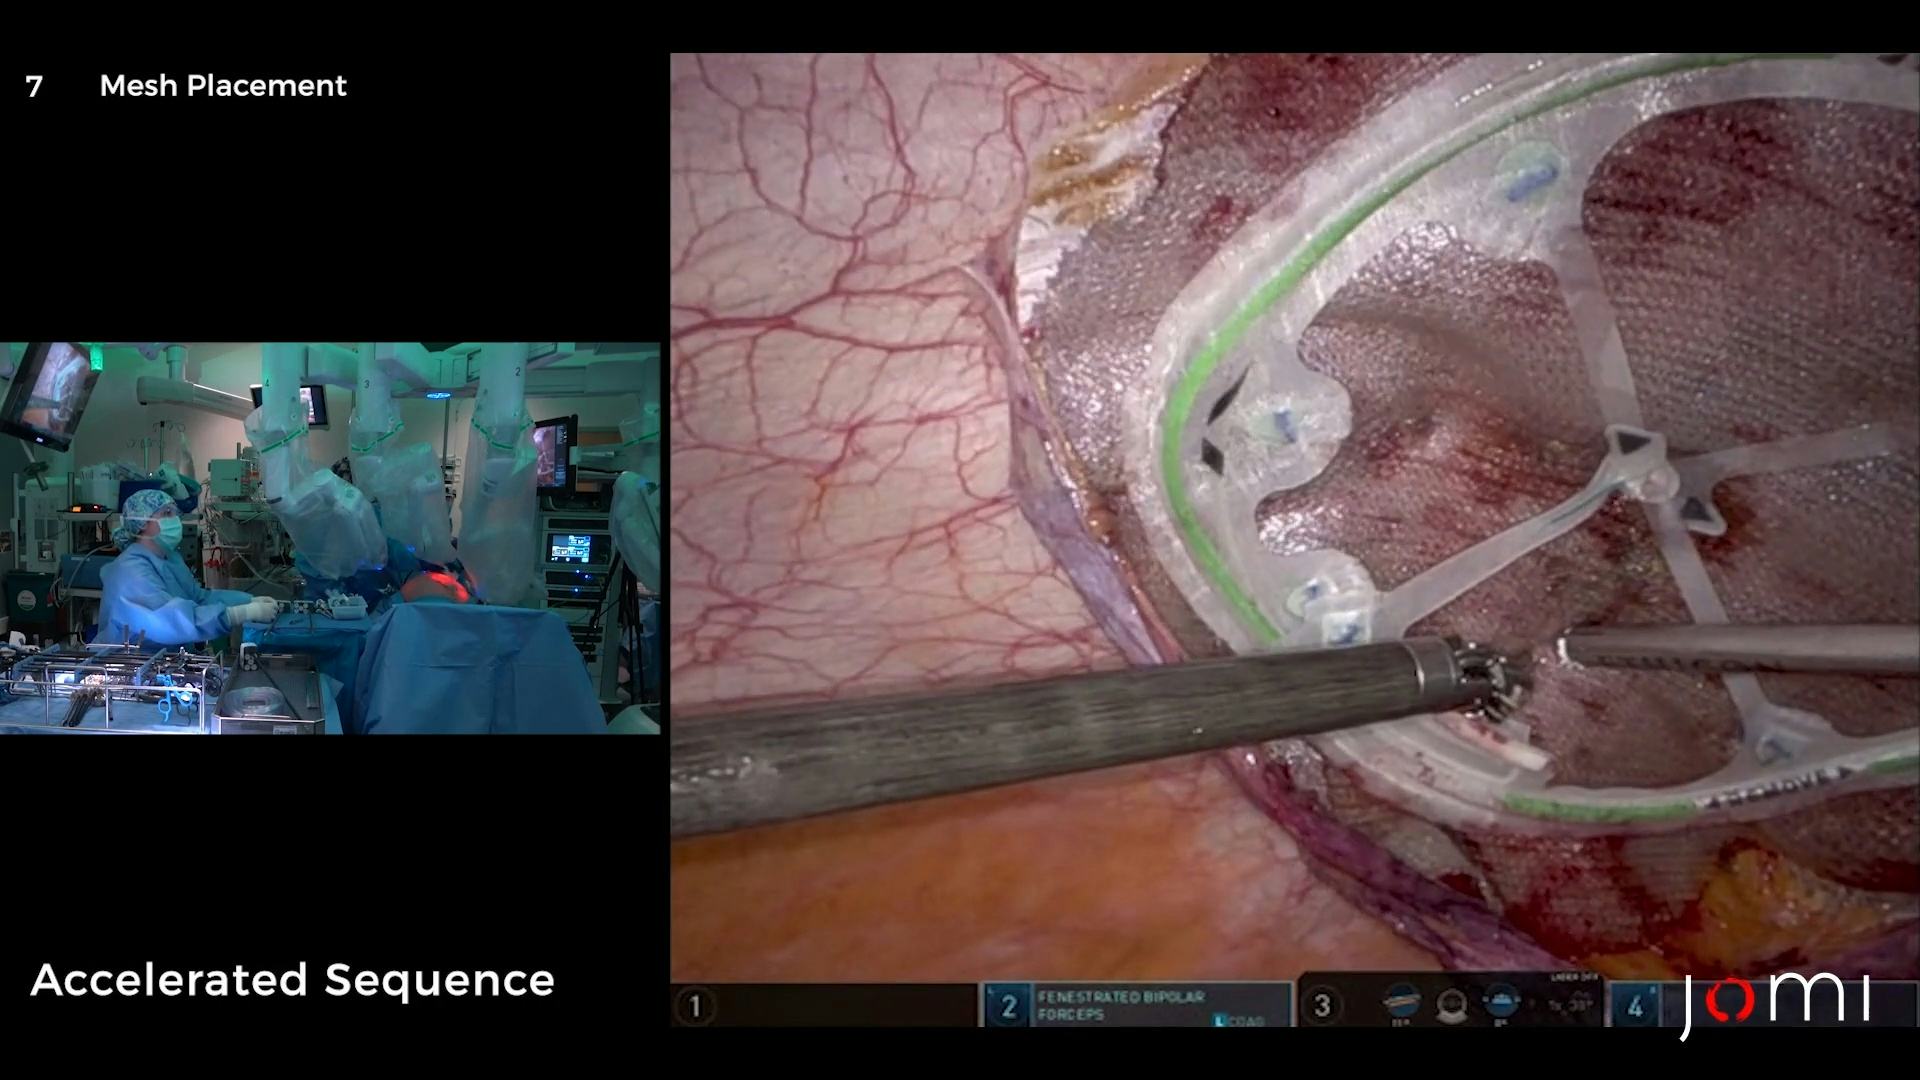
CHAPTER 7
You can take it and then pass the... I don't need anything in my right hand, you can just take this and then you can use the secure strap from that side. A little bit in the center. Yeah, if you can go, yeah, somewhere here will be great. Right there. Yeah, that's good. Okay. Yep. Ready? Okay, let me straighten it. We need just a little bit of flap there. Overall looks pretty good. We might need a scissor later, but I would go and anchor here. So if you can take the secure strap... So see the mechanism of this mesh, so it sort of stays open and you don't have to hold it with anything. So that's the advantage of this mechanism. Yeah, I think we need a little bit like here, you know, this flap. This little section? Yeah, okay, we'll anchor it first. Let's do all the four here, yep. Yep. And then four right in these spokes. So maybe right there. Yep. Yep. You straighten it out, yep. Okay. There. And one here. Actually, let's take this also. You can release from your side. Take the end. Separate. This one, I know I need to do that. One sec, yep. Perfect, take some scissors, just do this side a little bit. Looks very good here, right? We got a little bit of the peritoneum here, in this stitch. I mean this anchor, yeah. I think the, that's peritoneum. Yeah. The actual edges behind the mesh. Yeah. Yeah, there. I got a little bit of the peritoneum tacks here. We'll have to cut it. We may have to use another couple of tacks here, but... Almost. All right, why don't you anchor this. So if you can just take my scissors and just put a couple of anchors here. Sure, stop again? Yeah, I would do one here. Yep. Perfect, now let's drop the pneumo.
CHAPTER 8
Okay, what do you want the pneumo to? 8? One secure strap here. Oh, another one, okay. Oh yeah, multiple. Okay, so you won't need a suture? No. All right. One sec. Can you stretch that middle a little bit so it can cover, yeah. Okay, right there, next to it, one more time towards me. Higher, yes. Okay. There. Okay. Something like that. Towards the periphery, yeah. So the peritoneum actually grows. So yeah, if you can maybe anchor it right there, yep. Are you out? I'm gonna be out. Oh, that's okay. Can you give me the 3-0 Vicryl? Sure. Can I burp the camera a little bit? Yes, please, yep. And like I said, this A) it's covered, B) this actually grows. These defects, the peritoneum actually covers it if there is... Yeah, oh, maybe just stretch this, that's all. Like take this guy and just somewhere here, you know, just a simple stitch. Take this, this edge right here. This edge, right here, this edge. Oh, this edge. Yeah. To? To this. That edge, okay. Yeah. Take it in two, yeah, take the middle piece too. Yeah, take that. Like through it? Yeah. You want more peritoneum, so it just sort of bridges on it's own. Yeah. Yeah, and then this, just flatten this with your left hand on the mesh, other way around. This way? Other way. Like it flips this way, yes. And then... And just take any part of that, or just take here if you want. I'm gonna do this. And then, end it in here. Do you wanna include mesh or no? You can. A little bit of mesh. And then this. And the top layer of peritoneum. Yeah, yeah. Perfect, and see if it comes together. If it, even if it doesn't, it's fine, just... I don't know if it'll come together, we'll see. Stretch it that way, that way. Take it back there, yeah, correct. That's good. It's gonna rip more. Yeah, that's fine. That's just, keep it there and just tie it. That's perfect. Yeah. Quickly tie it before it unravels. There, take it. Yeah, perfect. Tie, tie, tie. Yeah. Just get one more and cut it. Or actually cut it later, just do the V-Loc. Don't put tension on your repair, like, yeah. Okay, gab it, yeah, perfect. Good, awesome. Just leave it there, okay. Take the other needle. It's right here, yep. All right, just run it. It doesn't have to be watertight, right, so, yep. Yeah, to there. And come back and then go through the knot. Rotation, a lot of rotation. Watch the peritoneum here. Yeah, correct, and come back. Just do forehand, that's okay, yeah. Do it right? Yeah, that's great. Yeah. Perfect, and then this. Maybe do it into safer. Yeah, somewhere here. Lower. Go through this. Yeah. Not through - it will just rip. Yeah, I would go down. Yeah. Yeah. Yeah, yeah. Just keep the needle there and just put it... Okay, good. And again, rotation. Watch the tension on the peritoneum, yep, yeah, pull, pull, pull I'll need one more and then... You sure? Yes. Okay, and pull, pull the whole thing. As much as it gives and towards the direction. Perfect, that's it. That's it, yeah. Whoever invented V-Loc is a genius, took us only. That person retired. Just only took us a few hundred years to realize. Right in the middle will be great and then in the middle of that, and then pull and see, don't lock it, yeah, yeah. One more bite I think. Perfect, I would just go at the apex, near the apex sort of. Yep, right there. Yep. You're too far, yeah, and I think you took mesh, but that's okay. Oh, I did. It's okay. Scissors, please. Great. And then take both the needles. And then just transform your hand so you hold the other one too. With the same hand, hold this guy. Open it. You help with this hand, yeah. Fit it, perfect, okay. Needles back, looks very good, most of this will regrow. Yeah. Awesome, looks very good. Yep, very good. Okay, we can undock.
CHAPTER 9
Nicely done, I like your flaps, very nice. I really like the little hernias. Yeah. It makes a lot of sense. Yeah, it does. It does, and you know, one of the key things in hernia repair, you'll hear it again and again, is the mesh, as far as possible, even if it's covered, you should try to cover it because we see all kinds of stuff down the road. Also the coverage, so many times it gets shifts and... Yeah, yeah. And you know, that's the other thing with this thing, you are right in the center. I think that also helps to wider coverage. The next step we gonna do the TAP blocks. So 20 in each corner. I'll take the local.
CHAPTER 10
So on this you can see the transversalis very well, this is one of the techniques that's very important laparoscopically that you go into the this thing, plane, and then you literally raise the transversalis. As it's being shown here. Yeah. So the neurovascular plane is in between the transversalis and the internal oblique. And with this technique, you're raising that to infiltrate, essentially, that plane. Would you like to use the Endo Close? Not for the - no. We don't - it's like lap chole, we don't close it. We can try, but we don't have to. We'll trade. I would go anterior a little bit, like here, yeah. And, sorry, let me - okay, yeah. And then, yeah, perfect, all of it right there. You're slightly deeper, as you can see. Yeah, see, you're more in the like subperitoneal than... Okay, and that's 30, I need more. I would go like maybe 20, 10, something like that. Yep. Can move that port just so that you can see. Yeah, perfect, yeah, nice. So this is, yeah, very nice. That's the plane you want to be. So, I'm okay with Toradol. Thank you. We'll need an extra large binder as well. I would go lateral, just, yeah, that's perfect. Yeah, right there. How many cc have we used? This will be 90. That's 90? Yes. Perfect, so then 10 we'll use for the skin. Great.
CHAPTER 11
All right, that port out. Okay look at this one, here. We can flatten him, please. Flattening. Great. Gas off, yeah. Okay, lights on and everything? Yes, please, we can just take a stitch here. I think we can see it very well, he's not that - yeah. Yeah. Two S-retractors. Can we get the room lights on all the way, please? Can I have table up just a little bit, please? Table coming up. Thank you. Thank you. There it is. Yeah. Just one in the center, you think or? Need a figure-of-eight. Okay, all right. It's right here. The white, yeah. I don't see it. I can see it. Oh, I see it. Yeah. It's pointing right at me. Yeah. Right there. We're just closing the fascia with a figure-of-eight stitch. Right there in the corner, I don't know if you can see. I think that... Yeah. Just injecting local before you tie. Needle back, I'll take a 4-0, please. Cut, please. Go back here. I'll take a 4-0 for him. And cut. Yep. All right, very good. Needle back, just Steries on all three, good. Two, three, four, five, six, seven, eight. So the procedure - robotic laparoscopic repair, ventral recurrent, with mesh. No specimen, EBL minimal. We gave all the local, and Toradol, right? Yep, I gave him a small dose. Okay, and I have no concerns. Awesome, thank you very much. Wound class one. Awesome. Yeah.